

Monitoring your CPU temperature is crucial for maintaining optimal performance and preventing overheating. High temperatures can lead to system instability, reduced performance, and even hardware damage. Regularly checking your CPU temperature allows you to take proactive measures to protect your system and enhance its longevity.
“To check CPU temperature in Windows 10, use third-party tools like Core Temp or HWMonitor. You can also view the temperature in BIOS/UEFI during startup.”
In this article, We will discuss “ how do I check CPU temperature in windows 10”
Table of Contents
Why Monitor CPU Temperature:
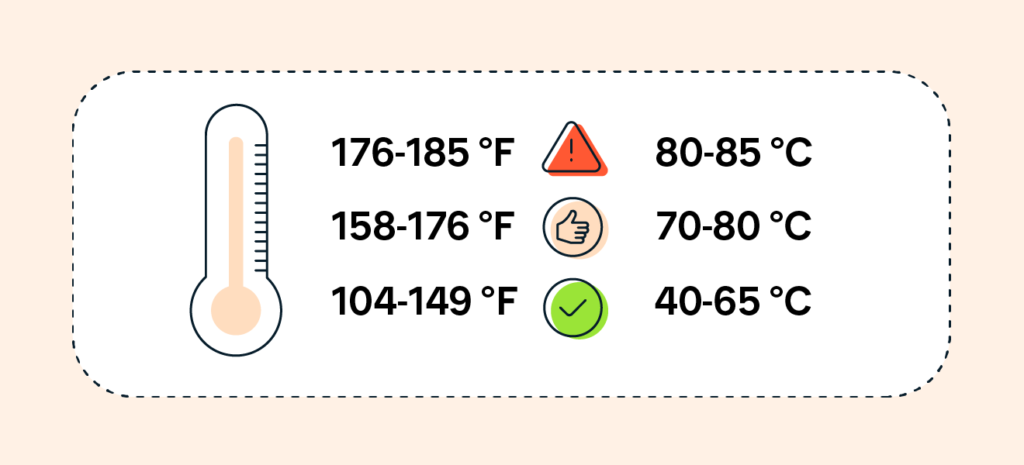
Keeping an eye on your CPU temperature helps ensure your system runs efficiently and extends its lifespan. Elevated temperatures can cause thermal throttling, where the CPU reduces its speed to prevent overheating, leading to performance issues. High temperatures may also shorten the life of your components, particularly the CPU and motherboard.
Regularly checking your CPU temperature can help you detect cooling problems early, such as failing fans or insufficient thermal paste application. By monitoring your CPU temperature, you can make informed decisions about hardware upgrades, cooling solutions, and overall system maintenance.
Ways to Monitor Your CPU Temperature in Windows 10:
There are several effective ways to monitor your CPU temperature in Windows 10. You can use third-party applications such as Core Temp or HWMonitor for real-time readings and detailed statistics about your CPU’s performance. Additionally, accessing BIOS/UEFI during startup provides an accurate temperature reading directly from the motherboard, ensuring reliable monitoring of your CPU’s thermal state.
Using Third-Party Software:
Several reliable applications can provide real-time temperature readings for your CPU. Here are some popular options:
- Core Temp: This lightweight tool displays the temperature of each core of your CPU. It also provides additional information such as CPU load, clock speed, and more. Core Temp is user-friendly and supports a wide range of processors.
- HWMonitor: A comprehensive monitoring tool that tracks the temperature of your CPU, GPU, and other components. It presents data in a user-friendly format, allowing you to see the temperatures of various components in one place.
- Open Hardware Monitor: An open-source program that monitors temperature sensors, fan speeds, and voltages. It provides an easy-to-read interface and can run in the background while you use your computer.
- MSI Afterburner: Primarily known as a GPU overclocking tool, MSI Afterburner also provides CPU temperature monitoring along with real-time performance graphs.
Also Read: Windows 11 CPU Compatibility List – Is Your Processor Supported!
Steps to Use Core Temp:
- Download and install Core Temp from its official website.
- Launch the application after installation.
- View the temperature readings for each CPU core displayed in the main window. The temperature is often displayed in Celsius, allowing for easy interpretation.
Accessing BIOS/UEFI:

You can check your CPU temperature directly in the BIOS/UEFI firmware settings, which may provide a more accurate reading as it comes directly from the motherboard sensors.
- Restart your computer and press the designated key (often F2, Delete, or Esc) during boot-up to enter BIOS/UEFI. The exact key may vary by manufacturer, so check your motherboard manual if unsure.
- Navigate to the Hardware Monitor, PC Health Status, or a similarly named section (the exact name will vary based on your motherboard).
- Look for the CPU temperature readings displayed on the screen, often shown in Celsius or Fahrenheit.
This method provides a direct reading from the motherboard and can be more accurate than software readings since it doesn’t rely on the operating system.
Using Windows PowerShell:
For those who prefer a command-line approach, Windows PowerShell can be used to check CPU temperatures. However, this method may not work on all systems as it depends on motherboard and sensor support.
- To start PowerShell with admin rights, right-click the Start menu and choose “Windows PowerShell (Admin).” This lets you run commands that require higher access levels.
- The output will show the CPU temperature, but the value may need to be converted from Kelvin to Celsius. Subtract 273 from the displayed value to get the temperature in Celsius.
Using Task Manager (Limited Functionality):
While Task Manager in Windows 10 does not provide direct CPU temperature readings, it can give you insight into CPU performance and load, which can indirectly help you monitor temperatures.
- Right-click on the taskbar and select Task Manager or press Ctrl + Shift + Esc.
- Go to the Performance tab.
- Click on CPU on the left sidebar to see real-time usage statistics, including load percentage, which can be helpful in understanding how hard your CPU is working.
While this method doesn’t display temperatures, it can help you gauge whether high CPU usage correlates with potential overheating.
Also Read: Do I Need Two CPU Power Cables – A Complete Guide!
Essential Tips for Keeping Your CPU Cool:
- Ensure Adequate Cooling: Make sure your computer case has proper airflow, with intake and exhaust fans functioning correctly. Consider adding more fans or upgrading to higher-performance models if necessary.
- Clean Dust Accumulation: Dust buildup can obstruct airflow and trap heat. Regularly clean dust from your CPU cooler, case fans, and vents to improve cooling efficiency.
- Apply Thermal Paste: If you’ve recently upgraded your CPU cooler or are experiencing high temperatures, ensure that thermal paste is applied correctly. Proper application of thermal paste can significantly improve heat transfer from the CPU to the cooler.
- Monitor Under Load: Check CPU temperatures while running demanding applications or games to assess cooling efficiency. This will give you a better idea of how your cooling solution performs under stress.
- Upgrade Cooling Solutions: If your CPU consistently runs hot, consider upgrading your cooling solution. Options include larger air coolers or liquid cooling systems that provide better heat dissipation.
- Avoid Overclocking: Overclocking your CPU can lead to increased temperatures. If you’re not experienced with overclocking, it’s best to keep your CPU at stock settings to avoid overheating.
- Check Ambient Temperature: The room temperature where your PC is located can impact CPU temperatures. Ensure your workspace is well-ventilated and cool.
FAQ’s
On Checking CPU Temperature in Windows 10:
1. How can I check my CPU temperature in Windows 10?
You can check your CPU temperature using third-party software like Core Temp or HWMonitor, or by accessing BIOS/UEFI settings during startup.
2. Is there a built-in way to check CPU temperature in Windows 10?
Windows 10 does not have a built-in tool to check CPU temperature, but you can use Windows PowerShell for a command-line method if your system supports it.
3. What are the risks of not monitoring CPU temperature regularly?
Failing to monitor your CPU temperature can lead to overheating, causing thermal throttling, system instability, and potential hardware damage over time. Regular checks help maintain optimal performance and longevity.
4. Can I check CPU temperature from Task Manager?
No, Task Manager does not display CPU temperature, but it shows CPU usage and performance statistics, which can help gauge system load.
5. Can I use Windows PowerShell to check my CPU temperature?
Yes, you can use Windows PowerShell to check CPU temperature, but this method depends on your motherboard’s sensor support and may require converting the temperature from Kelvin to Celsius.
Conclusion
Monitoring your CPU temperature in Windows 10 is essential for maintaining optimal system performance and preventing overheating. By using third-party software like Core Temp or accessing BIOS/UEFI, you can easily check your CPU’s temperature. Regular monitoring helps you identify potential cooling issues and ensures your hardware operates efficiently over time.