
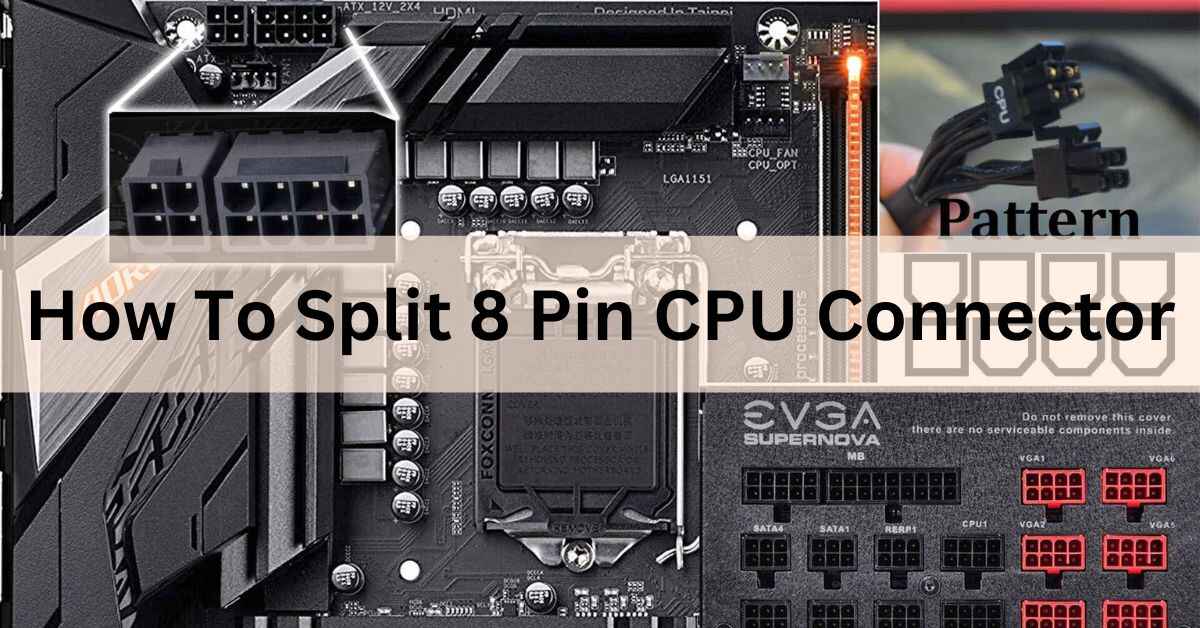
The 8-pin CPU connector, commonly known as the EPS connector, is designed to deliver power to the CPU on your motherboard. It provides more power stability than a standard 4-pin connector, which is crucial for high-performance CPUs that demand more energy during operation. The 8-pin connector consists of two 4-pin sections, typically labeled on the cable, and is often found in modern power supplies and motherboards.
“To split an 8-pin CPU connector, simply detach the two 4-pin halves along the perforation line. Each half is used for connecting to 4-pin or 8-pin motherboard CPU power slots, depending on your system’s needs.”
In this article, We will discuss “ how to split 8 pin cpu connector”
Table of Contents
How to Split an 8-Pin CPU Connector:
When setting up a new PC or upgrading existing hardware, you may encounter an 8-pin CPU power connector that needs adaptation. Splitting this connector can help simplify your cable management and ensure compatibility with your motherboard’s power requirements. This article provides a detailed guide on how to split an 8-pin CPU connector, the significance of this process, and important considerations to keep in mind.
Benefits of Splitting the 8-Pin Connector:
- Flexibility: Many motherboards require only a 4-pin connection, especially in less demanding systems. Splitting the 8-pin connector allows you to use the available power connectors more effectively without cluttering your setup.
- Improved Cable Management: By using two 4-pin connectors, you can route cables more conveniently within your case, promoting better airflow and overall aesthetics.
- Enhanced Compatibility: Some older motherboards may only support 4-pin connectors. Splitting the connector ensures compatibility with a wider range of hardware.
Step-by-Step Instructions for Splitting an 8-Pin CPU Connector:
Identify the Connector:
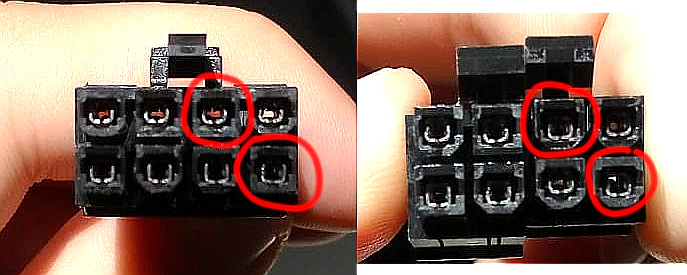
Before starting, confirm that you have a standard 8-pin CPU power connector. The connector should look like two 4-pin segments joined together. Before starting the process, confirm that you have a standard 8-pin CPU power connector, which typically consists of two 4-pin segments. Make sure to check for any labels or markings on the cable to ensure you are working with the correct component.
Also Read: Intel Lga 1151 CPU List – Best Intel LGA 1151 Processors!
Locate the Perforations:
Most 8-pin connectors feature perforations or a clear seam indicating where they can be split. This design allows for easy separation without damaging the connector. Examine the 8-pin connector for visible seams or perforations that indicate where it can be split. These design features are typically placed to facilitate easy separation without damaging the connector itself.
Carefully Split the Connector:
- Firmly hold the connector with one hand.
- Gently pull the two halves apart along the perforation. Apply steady pressure, but avoid forcing it to prevent damaging the connector.
- You should now have two distinct 4-pin connectors.
Connect to the Motherboard:
- Locate the appropriate slots on your motherboard. If it requires a single 4-pin connector, insert one half into the designated slot. If it has an 8-pin slot, connect both halves for maximum power stability.
- Ensure the connectors are firmly seated to avoid any power issues.
Manage the Cables:
After connecting the power supply, tidy up your cables using cable ties or Velcro straps. Proper cable management not only improves aesthetics but also ensures optimal airflow, which is crucial for maintaining lower temperatures within the case.
Important Tips for Splitting an 8-Pin CPU Connector:
Double-Check Compatibility:
Before splitting and connecting, verify that your power supply and motherboard support the configuration you intend to use. Refer to the motherboard manual for specifications on CPU power connections. Ensure that your power supply and motherboard specifications support the use of the 8-pin connector configuration to avoid any compatibility issues during setup.
Handle with Care:
When separating the connectors, be gentle. Forcing the split can lead to broken plastic housing or bent pins inside, resulting in potential connection issues. Gently pull apart the halves of the connector to avoid damaging the pins or housing, as excessive force can lead to connection issues or component failure.
Ensure Power is Off:
Always turn off your system and unplug it from the electrical outlet before making any changes to prevent electrical shocks or damage to the components. Always turn off your computer and unplug it from the electrical outlet before attempting to split the connector to prevent electrical shock or damage to your components.
Also Read: Can I Use Higher Frequency Ram Than CPU-Comprehensive Guide!
Troubleshooting Common Issues:
Symptoms of Incorrect Connections:
- “Unknown” CPU in System Information: If your CPU is not recognized, it may indicate a connection issue. This typically occurs when a 4-pin connector is incorrectly seated in an 8-pin slot.
- Boot Failure: If the CPU power is not adequately supplied, your system may fail to boot. This issue can arise from using only one half of the split connector when the motherboard requires both.
- System Instability: Inadequate power can lead to system crashes, random shutdowns, or kernel panics, especially during high-load tasks.
Keeping Up with New Technologies:
As technology evolves, it’s essential to stay informed about new power supply units and motherboard designs. While many modern motherboards still support the 8-pin configuration, emerging technologies may introduce new power requirements. Always check the manufacturer’s documentation for compatibility and power specifications.
FAQ’s
1. What is an 8-pin CPU connector?
An 8-pin CPU connector, often referred to as an EPS connector, provides power to the CPU on the motherboard and consists of two 4-pin sections that can be split for easier management.
2. How do I safely split an 8-pin CPU connector?
To split the connector, gently pull apart the two halves along the perforated seam. Ensure you handle it with care to avoid damaging the pins or housing.
3. Can I use only one 4-pin connector?
Yes, many motherboards support a single 4-pin connection. However, using both halves is recommended for better power stability and performance.
4. What should I do if my CPU is not recognized after splitting the connector?
Double-check that both connectors are properly seated in their respective slots and that you are using the correct power supply for your motherboard.
5. Is it necessary to power off my PC before splitting the connector?
Yes, always ensure your system is powered off and unplugged to avoid electrical shock or damage to the components during modifications.
Conclusion
In conclusion, splitting an 8-pin CPU connector is a simple yet essential task in PC building that enhances cable management and compatibility with various motherboards. By carefully separating the connector and properly seating each half, you can ensure optimal power delivery to your CPU. Always remember to power off your system before making any modifications to avoid potential damage.